How to Install WordPress Plugin Easily | Step-by-Step Guide
Learn how to install WordPress plugin quickly and effortlessly. Follow our simple steps to add plugins and enhance your website today!
Cody Y.
Updated on Sep 12, 2025
Before you get started, it's good to know there are three main ways to install a WordPress plugin. You can grab free ones right from the WordPress Directory, manually upload a premium plugin’s ZIP file, or use FTP if you need more control. Picking the right method from the get-go will save you a lot of time and potential headaches down the line.
Choosing the Right Plugin Installation Method
Understanding your options is the first real step. Each method is designed for a different situation, from quick and easy additions to more hands-on, technical setups.
The WordPress ecosystem is absolutely massive, with over 59,000 free plugins available in the official directory. But here’s a telling statistic: only 62 of those have more than a million active installations. This shows that most store owners rely on a small, trusted set of tools to get the job done right.
This image breaks down the two most common approaches, helping you decide which one fits your needs.
Automate Shipping Compliance
Block orders to restricted states automatically. 3-day free trial.
Start Free Trial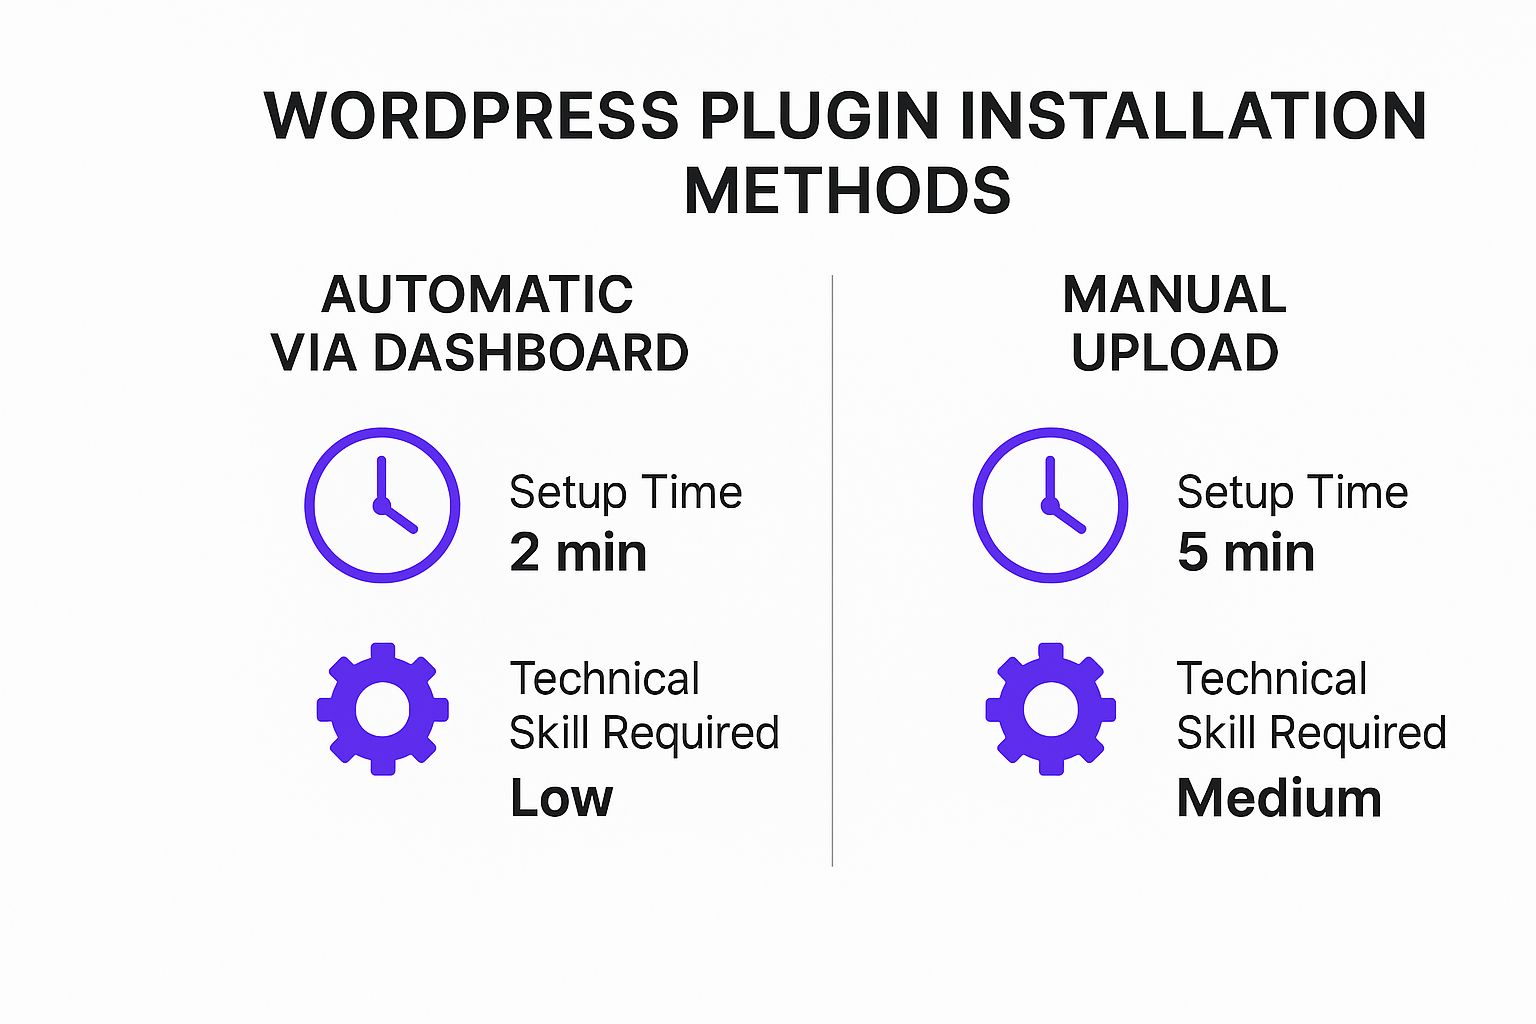
As you can see, installing from the WordPress dashboard is by far the fastest and easiest route, making it perfect for most users.
However, when you buy a premium plugin like Ship Restrict, you'll get a ZIP file. For that, you’ll use the manual upload method, which is straightforward. We cover those specific steps in our getting started guide as well.
Plugin Installation Methods at a Glance
To make it even clearer, let's break down the three installation methods. Think of this as a quick cheat sheet to help you decide which path to take based on what you're trying to do and how comfortable you are with the tech side of things.
| Method | Best For | Difficulty | Requirements |
|---|---|---|---|
| WordPress Dashboard | Installing free plugins directly from the official WordPress directory. | Easy | WordPress admin access. |
| Manual Upload | Installing premium or custom plugins from a ZIP file (like Ship Restrict). | Easy | WordPress admin access, plugin ZIP file. |
| FTP/SFTP | Troubleshooting, manual updates, or when the dashboard uploader fails. | Intermediate | FTP/SFTP client, server credentials. |
Ultimately, for 99% of plugin installations, you'll be using either the dashboard search or the manual uploader. The FTP method is really a fallback for when things go wrong or for developers who need that level of direct server access.
Using the WordPress Dashboard for Quick Installs
For most folks, the quickest and safest way to get a new plugin running is right through the WordPress admin dashboard. This method plugs you directly into the official WordPress Plugin Directory, a massive, curated library of free tools. The best part? You don't have to download a single file or mess with your server—it all happens inside your site.
To kick things off, just log into your WordPress dashboard and find the Plugins menu on the left. Hover over it and click on Add New Plugin. This screen is your gateway to thousands of tools that can extend what your website can do.
Finding and Vetting a New Plugin
Think of this search bar as your best friend. You can pop in a specific plugin name you already know, like "Yoast SEO," or just describe a function you need, such as "contact form" or "image compression." WordPress will immediately pull up a grid of options that fit your search.
This is where you need to put on your detective hat for a moment. The information on this screen is critical for judging a plugin's quality and whether you can trust it on your site.
Free Shipping Compliance Audit
We'll review your WooCommerce store's shipping compliance for free.

Before you hit that install button, always take a quick look at the plugin's details. A high number of active installations, glowing star ratings, and a recent "Last Updated" date are all great signs that you're looking at a well-maintained and reliable plugin.
Once you’ve picked a winner, just click the Install Now button. WordPress handles all the heavy lifting in the background, downloading the files and putting them in the right place. After a few seconds, that button will turn into a blue Activate button.
Why Activation Is a Separate Step You might wonder why installing and activating are two different clicks. It's a smart safety measure. Installation just places the plugin's files on your server. Activation is what actually integrates its code with WordPress. This two-step process lets you install something without immediately running its code, which is a great way to prevent potential conflicts until you’re ready.
Clicking Activate is the final move. The plugin is now live on your site, and you’ll usually be whisked away to its settings page or back to the main plugins list to start setting things up.
How to Manually Upload a Plugin ZIP File
When you buy a premium plugin like Ship Restrict, you won't find it in the free WordPress plugin directory. Instead, you'll get a downloadable .zip file. This is the standard way to install any plugin you've purchased directly from a developer.
The whole process is straightforward, but there's one golden rule I see people break all the time: do not unzip the file after you download it. WordPress is built to handle the compressed .zip file directly. If you unzip it first, the upload will fail every single time. It's a common mistake, so just keep that little file zipped up and ready to go.
Uploading and Installing Your Plugin
First, head back to your WordPress dashboard and navigate to Plugins > Add New Plugin. Look at the top of the page for a button labeled Upload Plugin. Go ahead and click it.
This will reveal a simple upload form. Click Choose File, find the plugin’s .zip file on your computer, and select it. You'll see the file name appear right next to the button.
Now, just hit Install Now. WordPress will work its magic—uploading the file, unpacking it into the right server directory, and preparing it for activation. After a few seconds, you should see a success screen confirming the installation.
The final piece of the puzzle is to click the blue Activate Plugin button. This is what actually integrates the plugin's code with your site and turns on its features. For some plugins, this step might automatically send you to a setup wizard or a settings page to get you started.
Troubleshooting Common Upload Errors If you run into an error like "The package could not be installed," it's almost always one of two things. You either accidentally tried to upload an unzipped folder, or your web host has a low file upload size limit. Before anything else, double-check that you're using the original .zip file.
Once activated, you're ready to start configuring the settings. With a powerful tool like a shipping rule engine, you’ll probably want to dive into our documentation to explore the https://shiprestrict.com/docs/advanced-setup and get everything dialed in perfectly.
Installing a WordPress Plugin with FTP
<iframe width="100%" style="aspect-ratio: 16 / 9;" src="https://www.youtube.com/embed/YRpeN03RCOI" frameborder="0" allow="autoplay; encrypted-media" allowfullscreen></iframe>Every now and then, the standard WordPress dashboard installer just won't cut it. Maybe you're locked out of your admin area, or you've hit an annoying file upload limit set by your web host. When that happens, knowing how to install a plugin directly using FTP (File Transfer Protocol) is a lifesaver. It’s a more hands-on method that gives you direct access to your website's server files.
To get started, you'll need an FTP client. This is just a small app that connects your computer to your web server so you can move files back and forth. FileZilla is a popular and free choice, but any client will get the job done. You’ll also need your FTP credentials—the host, username, and password—which you can almost always find inside your hosting account’s control panel.
Connecting and Uploading the Plugin Files
Once you've fired up your FTP client and connected to your server, you’ll see a layout of your website's file structure. Your mission is to navigate to the dedicated plugins folder, which is always located at /wp-content/plugins/. This directory is home to all the plugins currently installed on your site.
Now, here’s the one step that often trips people up: you must unzip the plugin file on your computer before you upload it. Unlike the dashboard method that handles the .zip file for you, the server needs the already-extracted folder.
After unzipping it, simply find the plugin's folder on your computer and drag it over into the /plugins/ directory in your FTP client.
Depending on the size of the plugin and your connection speed, the transfer might take a minute or two. Once it’s complete, you can head back over to your WordPress dashboard to finish the job.
Don't Forget the Final Activation Just uploading the files via FTP doesn't turn the plugin on. You still need to pop over to the Plugins page in your WordPress admin area. You’ll see the new plugin sitting in the list with an "Activate" link—give that a click, and you're all set.
This manual method isn't just a workaround; it's a core skill for troubleshooting and managing any website. With over 564 million websites now running on WordPress, understanding different ways to manage your plugins is an invaluable piece of expertise. You can find more stats on the widespread use of WordPress if you're curious.
Once activated, your new plugin is ready for configuration.
Alright, you've got the plugin installed. Great. But hold on—the job's not done yet.
Simply clicking "Activate" is like turning the key in a new car without checking if the tires are flat. The real work starts after installation. This is where you separate a powerful new tool from something that might quietly break your checkout process.
The first thing I always do is hunt down the plugin's settings. Most will add a new menu item to your WordPress dashboard. Look under Settings, Tools, or sometimes they get their own top-level spot in the sidebar. If you just installed a caching plugin, for example, you'll want to jump in and start tweaking its options right away to get that performance boost you were after. Never just activate and walk away.
Test for Conflicts and Unexpected Behavior
Once you've configured the basic settings, it's time to play detective. New plugins can sometimes clash with your theme or another plugin, leading to bizarre and frustrating issues. The only way to know for sure is to test the critical parts of your site.
I have a quick mental checklist I run through every single time:
- Homepage: Does it still load properly? Anything look out of place?
- Product Pages: Are all your images, prices, and "Add to Cart" buttons working as they should?
- Checkout Process: This is the big one. Can you run a test transaction from start to finish without a single error?
- Contact Forms: Do your forms still submit correctly?
If you hit a snag, chances are the new plugin is the culprit. Don't panic. You can usually find a fix in the plugin's support forums or by running through some basic troubleshooting. For more in-depth issues, especially with payment plugins, a practical guide to integrating WordPress with payment gateway functionality offers some really solid, specific steps to get things running smoothly. And if you're really stuck, our own troubleshooting docs are a great place to start: https://shiprestrict.com/docs/troubleshooting.
A Critical Housekeeping Rule Always, always delete plugins you aren't using. Deactivated plugins are a security nightmare. They don't get updates, leaving a backdoor wide open for hackers. It's one of the most common—and easily avoidable—vulnerabilities out there. If it's inactive, get rid of it.
Making this simple post-install check a habit is crucial. It's what keeps your site secure, stable, and fast, ensuring every plugin you add is an asset, not a liability.
Common Questions About WordPress Plugins
When you're getting the hang of WordPress, a few questions about plugins always seem to come up. Getting straight answers can save you a ton of time and prevent some major headaches down the road.
If you're just starting out, it helps to understand the fundamentals. You might be wondering, what a WordPress plugin is and how to use it effectively? Nailing down this concept is the first step to confidently managing your site.
Deactivating vs. Uninstalling a Plugin
One of the first things people ask is about the difference between deactivating and uninstalling. It's a simple but important distinction.
- Deactivating is like flipping a light switch off. The plugin stops running, but all its files and settings are still on your server, ready to be turned back on at any time.
- Uninstalling, on the other hand, completely removes every trace of the plugin from your website. The files are deleted for good.
As a best practice, you should always uninstall plugins you aren't using. Inactive plugins can become security weak points if they aren't updated, so it pays to keep things tidy.
How Many Plugins Are Too Many?
There's no magic number here. The real issue isn't the quantity of plugins you have—it's their quality. I've seen a single, poorly coded plugin grind a website to a halt, while another site runs perfectly with twenty well-built ones.
The key is to be ruthless about what you install. Focus only on high-quality, essential plugins. Make it a habit to regularly audit what's active on your site and get rid of anything that isn't pulling its weight.
What to Do if a Plugin Breaks Your Website
It's a moment of pure panic, but it happens to everyone eventually. You install a new plugin, and suddenly your entire site is inaccessible, showing the dreaded "white screen of death." Don't worry, there's a quick fix.
You'll need to disable the plugin manually. The easiest way is to use an FTP client or your web host's file manager. Just navigate to the /wp-content/plugins/ directory and find the folder for the plugin causing the problem. Simply rename that folder—adding something like "-disabled" to the end works great.
This action instantly deactivates the plugin, which should bring your site back online. From there, you can log in, figure out what went wrong, and decide if you want to try again or find an alternative.
At Ship Restrict, we build our plugin with performance and compatibility in mind to prevent these kinds of issues. Automate your shipping compliance with confidence. Learn more at https://shiprestrict.com.
Automate Shipping Compliance
Stop worrying about restricted states. Ship Restrict handles it automatically.

Cody Yurk
Founder and Lead Developer of ShipRestrict, helping e-commerce businesses navigate complex shipping regulations for regulated products. Ecommerce store owner turned developer.
Automate Shipping Compliance
- Block restricted states
- No more cancellations
- Set and forget
3-day free trial · Card required