Bulk Import Shipping Restrictions from CSV: Ship Restrict Tutorial - Easy Guide
Learn how to bulk import shipping restrictions from CSV with this comprehensive Ship Restrict Tutorial. Simplify your WooCommerce shipping setup today!
Cody Y.
Updated on Oct 13, 2025
For WooCommerce stores with complex shipping needs, the Bulk Import Shipping Restrictions from CSV feature in the Ship Restrict plugin is a total game-changer. It can take a tedious, multi-day task of manually punching in shipping rules and condense it into a single, efficient file upload. The time saved is enormous, but more importantly, it helps prevent costly errors.
Why Manual Shipping Rules Are Holding You Back
If you’re still managing shipping restrictions one by one, you’re operating with a significant handicap. We've all been there: navigating through menus, selecting options, and saving changes for each new rule. That process seems manageable when you only have a handful of products, but it quickly spirals into a logistical nightmare as your business scales.
This manual approach isn't just slow; it's a major source of preventable errors.
Imagine launching a new product line with specific shipping regulations across dozens of states. Manually creating hundreds of individual rules isn't just mind-numbingly boring—it's incredibly risky. A single typo or a forgotten restriction could lead to compliance issues, returned packages, and seriously frustrated customers. All that time spent on repetitive data entry is time you could be spending on marketing, customer service, and actually growing your business.
Automate Shipping Compliance
Block orders to restricted states automatically. 3-day free trial.
Start Free TrialThe True Cost of Manual Entry
The problem gets even worse when regulations change. A new state law or a shift in carrier policy can force you to go back and update countless rules individually. This reactive process is wildly inefficient and leaves your store vulnerable during the transition. The bigger your catalog and the more complex your ruleset, the more this manual bottleneck restricts your ability to adapt and grow.
This is what the Ship Restrict plugin looks like when handling multiple rules.

While the dashboard gives you a clean overview of your rules, managing hundreds or thousands of entries manually through this interface is just not practical for a growing business.
The real benefit of automation is reclaiming lost time and wiping out the potential for human error. Once you understand how to automate data entry, you'll really appreciate the efficiency gains from bulk importing. Instead of clicking through screen after screen, you're managing everything from a single, organized spreadsheet.
A Smarter Way to Manage Compliance
Using a CSV import completely transforms your workflow. You can prepare, review, and edit thousands of rules offline in a familiar spreadsheet program like Excel or Google Sheets. This approach delivers some serious advantages:
- Speed and Efficiency: What once took days of manual labor can now be done in a matter of minutes.
- Drastically Reduced Errors: By managing rules in a spreadsheet, you can easily spot inconsistencies and even use formulas to ensure data is accurate before you upload.
- Enhanced Agility: Adapt to regulatory changes almost instantly. Just edit your CSV, re-upload, and your store is compliant without any downtime.
By shifting to a bulk import system, businesses can maintain a clear, auditable record of all shipping restrictions in a single document. This not only simplifies internal management but also provides a solid foundation for compliance checks.
This strategic shift isn't just theoretical; it's backed by real results. In fact, firms that use bulk restriction imports often see a 25%-50% reduction in their manual compliance workload. This efficiency is especially critical in volatile trade environments where policies can change unexpectedly.
Preparing Your CSV File for a Perfect Import

The success of your bulk import comes down to one thing: a properly structured CSV file. Think of it as giving the plugin a clear set of instructions. If the format is off, it simply won't understand your commands. A little prep work here will save you a world of headaches down the line.
Before you even open a spreadsheet, know exactly what you want to restrict. Are you blocking specific items from being shipped to California? Preventing air freight for hazardous materials to certain ZIP codes? A clear goal makes building the CSV much more straightforward.
Free Shipping Compliance Audit
We'll review your WooCommerce store's shipping compliance for free.
This file becomes your single source of truth for all shipping logic. Getting it right ensures a smooth, error-free upload that perfectly mirrors your business rules.
Essential CSV Columns for Ship Restrict Imports
Your CSV needs specific columns that the Ship Restrict plugin is built to recognize. Each column header has to be an exact match—even a tiny typo or an extra space can cause the entire import to fail. Let's break down the core components you’ll be working with.
Here is a quick reference guide for the columns you'll need in your spreadsheet. Getting these right is the key to a successful import.
| Column Name | Description | Accepted Values | Example |
|---|---|---|---|
group_name | The name of the restriction group. All rules in a group work together. | Any text string. | California Restrictions |
condition_type | Defines what is being restricted (e.g., a product, a state, a shipping method). | Varies by rule, e.g., state, postcode, product_cat. | state |
condition_value | The specific value for the condition type. | Depends on condition_type. | CA |
action | What happens when the condition is met (e.g., hide a shipping method). | Varies, e.g., hide_shipping. | hide_shipping |
action_value | The specific shipping method or service to hide. | The shipping method ID. | usps:priority |
Getting these columns and their values correct is the most critical part of the process. In my experience, a misplaced header or an invalid condition_value is the number one reason for import errors.
Structuring Your Data for Common Scenarios
Let's translate these columns into some practical, real-world examples. Imagine you need to stop specific products from shipping to New York and also block expedited shipping for a whole product category going to Alaska.
Scenario 1: Restricting a Specific Product to New York
Your CSV rows for this rule would look something like this:
- group_name:
NY Product Block - condition_type:
product - condition_value:
12345(This is the WooCommerce Product ID) - action:
hide_shipping - action_value:
all(This hides all shipping options for this product to NY)
You would then add a second row using the same group_name to define the location:
- group_name:
NY Product Block - condition_type:
state - condition_value:
NY - action:
hide_shipping - action_value:
all
That shared group_name is what tells Ship Restrict that these two conditions work together to create a single, powerful rule.
This ability to quickly update rules is invaluable. When international tariffs or sanctions change overnight, a CSV import lets you modify thousands of restrictions at once, keeping your store compliant without tedious manual work.
Pro Tip: Always use the official two-letter state codes or standard postal codes. Avoid using full state names or informal abbreviations. The system needs an exact data match to apply the rules correctly.
Ultimately, a clean CSV file is your best defense against errors. Taking a few extra minutes to double-check your headers, values, and any special characters will make your Bulk Import Shipping Restrictions from CSV a seamless process. A well-organized file is the foundation for a powerful, automated compliance system that saves you time and prevents costly mistakes.
How to Run the Ship Restrict Import Process
With your perfectly formatted CSV file in hand, you're ready to get those rules into your store. The import itself is surprisingly quick, but it's critical to know the options inside the Ship Restrict plugin to avoid common mistakes—like accidentally wiping out all of your existing rules.
First things first, you need to find the import tool. From your WordPress dashboard, look for the bulk management options under the main Ship Restrict menu. This is your central hub for both exporting your current rules (a great way to grab a template) and importing new ones.
Locating and Using the Import Tool
Once you’re in the import section, the interface is clean and straightforward. You'll see a clear option to upload your CSV file. This is where you’ll select the spreadsheet you just spent time preparing.
After you select your file, the plugin doesn't just jam the data in. It moves to the most important stage: mapping your columns.
This isn’t unique to Ship Restrict, by the way. The general workflow for CSV imports in WordPress is pretty consistent across different plugins. If you want a broader look at how this works, you might find a detailed guide on importing pages from a CSV file in WordPress helpful. The core principles of uploading a file and then telling the system what each column means are the same.
This infographic breaks down the three main stages of the process, from uploading your file to the final confirmation.
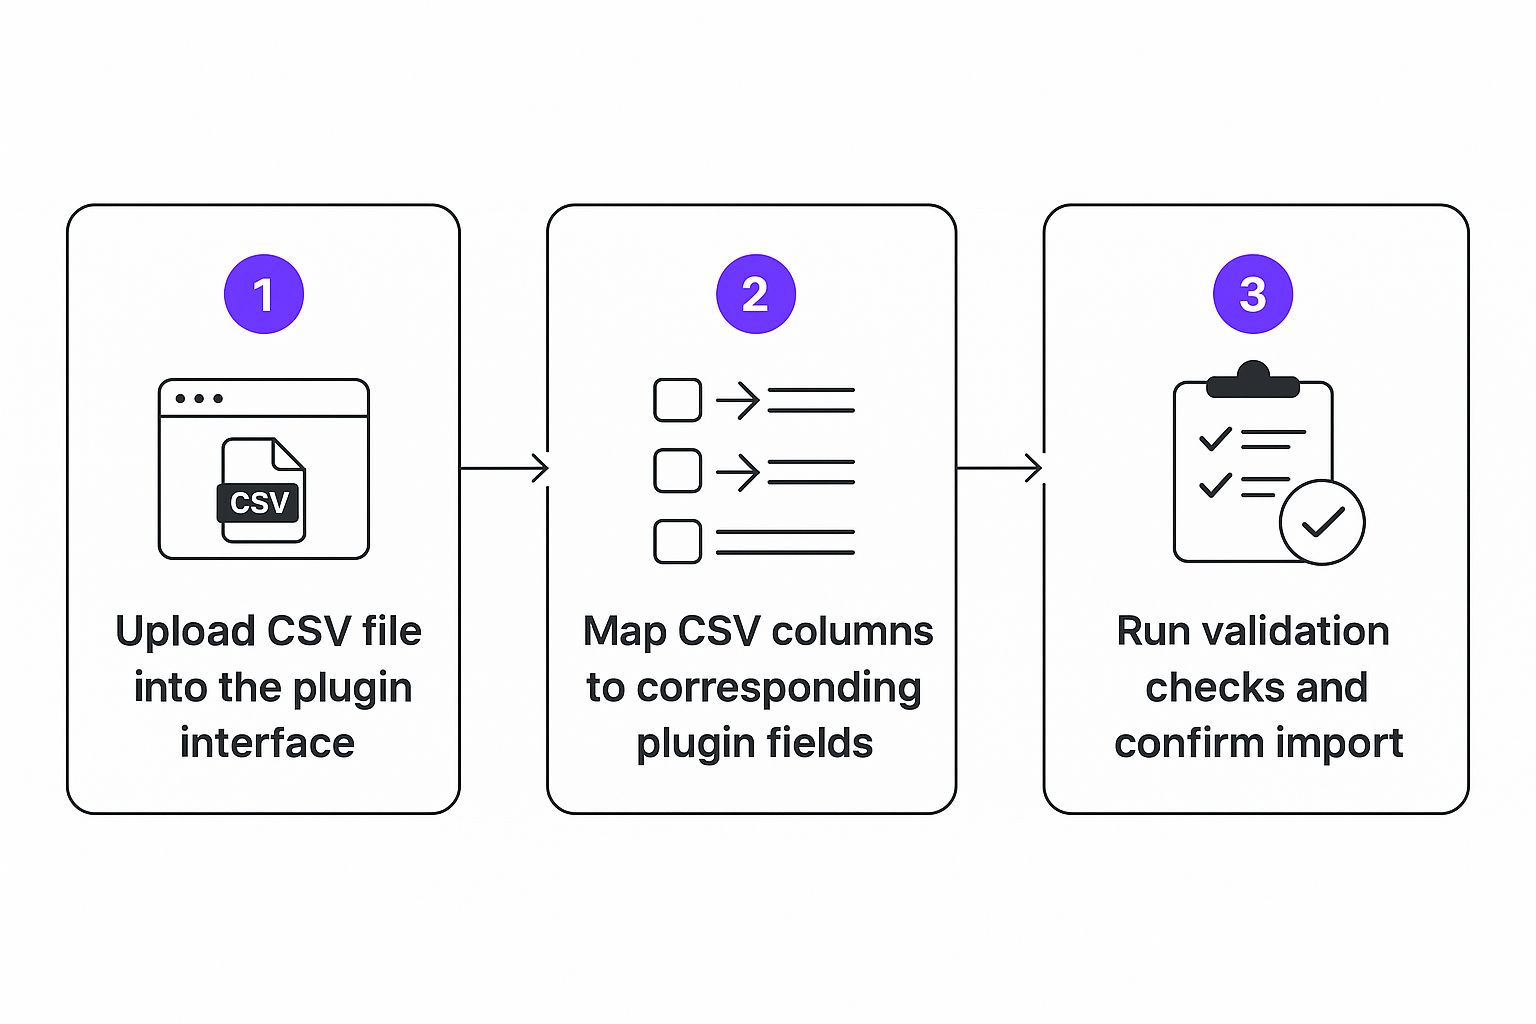
As you can see, importing is a multi-step verification process, not just a one-click action. It gives you control at each stage to make sure things are right.
Mapping Your CSV Columns
The mapping screen is your most important checkpoint. Here, the plugin shows you the column headers from your CSV file on one side and its required data fields on the other. Your job is to make sure each piece of data from your file is correctly assigned to the right field in Ship Restrict.
It’s pretty simple:
group_name: Map this to the "Group Name" field.condition_type: Make sure this is mapped to "Condition Type."condition_value: This has to be linked to the "Condition Value" field.
If your CSV headers match the plugin’s expected names exactly, this mapping often happens automatically. But don't trust it blindly—always double-check it. A mismatch here is probably the #1 source of failed imports, so taking a few seconds to review is well worth the time.
The plugin’s official documentation on bulk import shipping restrictions from CSV has detailed guidance on this step. To really dig in, you can review the complete process in the official Ship Restrict bulk management documentation.
Finalizing and Validating Your Import
Before you commit, Ship Restrict gives you one final safety net: a pre-import validation check.
The plugin scans your file for obvious errors like missing required columns or data that just doesn't look right. If it finds any potential issues, it will spit out a warning message with details about which rows are causing the problem.
This validation step is your best friend. It’s designed to prevent a bad import from corrupting your existing shipping rules. Pay attention to any warnings it gives you. It’s always better to cancel the import, fix the issue in your CSV, and start again than to force a faulty file through.
Once the validation passes without a hitch, you'll see a confirmation screen summarizing the number of new rules to be added or updated. Give it one last look, then hit the final import button to apply the changes to your store. A success message will pop up, confirming your new shipping restrictions are now live.
Advanced Scenarios and Real-World Use Cases

Once you get the hang of the basics, you'll discover the real power of bulk importing shipping rules from a CSV: tackling complex, multi-layered logistics. These are the advanced scenarios where you can save a ton of time and sidestep the costly compliance errors that growing businesses inevitably face.
It's time to move beyond simple state-based restrictions and dig into some real-world challenges. From hazardous materials to exclusive wholesale rates, your CSV file is the key to managing incredibly detailed shipping logic.
Restricting Specific Product Variations
Imagine you sell a chemical product that comes in two sizes: a 1-gallon jug (non-hazardous) and a 5-gallon drum (classified as hazardous). Because of carrier regulations, that 5-gallon drum can't be shipped via air freight. Trying to manage this for every single zip code manually is a non-starter.
This is where a CSV import becomes your best friend. You just need one rule group that targets the specific product variation ID and restricts the air shipping method.
- group_name:
Hazmat Air Freight Block - condition_type:
product_variation - condition_value:
67890(The Variation ID for the 5-gallon drum) - action:
hide_shipping - action_value:
fedex:2day_air
This single rule, applied across your entire store, handles compliance perfectly without messing with the smaller, non-hazardous variation. It's a precise, automated fix for a common logistical headache.
Applying Rules Based on User Roles
Another powerful use case is setting up different shipping rules for different customer groups, like your retail shoppers versus your wholesale partners. For instance, you might offer free freight shipping to your wholesale accounts but need to hide that option from everyone else.
You can set this up in a flash using the user_role condition type in your CSV.
- group_name:
Wholesale Freight Access - condition_type:
user_role - condition_value:
wholesale_customer - action:
show_shipping - action_value:
freight_shipping
Of course, you'd also create a corresponding rule to hide freight_shipping for all other user roles. This lets you manage complex B2B shipping logic right alongside your B2C rules, all from a single spreadsheet. For a deeper dive, you can explore more examples in the official documentation, which covers a variety of specific Ship Restrict use cases.
By combining multiple conditions within the same rule group—like user role, product category, and destination state—you can build incredibly sophisticated shipping logic. For instance, you could offer a specific discounted shipping rate only to wholesale customers in California who are purchasing from the "Bulk Supplies" category.
Weight-Based Restrictions for Product Categories
Let's say you sell heavy-duty equipment. Any order containing items from your "Heavy Machinery" category that weighs over 150 lbs has to go via a special freight carrier—it absolutely can't be sent through standard ground services.
Here’s how you’d build that rule in your CSV using two conditions in the same group:
- First Row:
group_name:Heavy Freight Rule,condition_type:product_cat,condition_value:heavy-machinery - Second Row:
group_name:Heavy Freight Rule,condition_type:weight,condition_value:150
You'd then add an action row to this group that hides standard shipping methods like ups:ground. This simple setup ensures that any heavy order is automatically routed to the correct—and safe—shipping option, preventing logistical mistakes and surprise fulfillment fees.
Each of these scenarios shows how a well-structured CSV transforms the Bulk Import Shipping Restrictions tool from a simple time-saver into a core part of your operational strategy.
Troubleshooting Common Import Errors
Even with the most carefully prepped spreadsheet, import errors can pop up from time to time. Don't panic—it’s almost always a small, easily fixable issue hiding in your CSV file. The key is knowing what the error messages actually mean so you can fix the problem and get back to business.
Think of an error message as a helpful signpost. Instead of a generic "import failed," the Ship Restrict plugin tries to point you directly to the source of the trouble so you can resolve it quickly.
Decoding Header Mismatch Errors
One of the most common issues you'll run into is the dreaded 'Header Mismatch' error. This message simply means a column title in your CSV doesn't perfectly match what the plugin is expecting. The importer is incredibly sensitive to typos, extra spaces, or even slight differences in capitalization.
For example, if you accidentally type groupname instead of the required group_name, the whole import will fail. The fix is usually straightforward:
- Open your CSV file again.
- Carefully compare each of your column headers against the official required names.
- Correct any mistakes, save the file, and try the import one more time.
This single check solves the vast majority of initial upload problems. It's a classic case of a tiny detail having a big impact on the Bulk Import Shipping Restrictions from CSV process.
Handling Invalid Data and File Readability
Another frequent roadblock is an 'Invalid Data Format' error. This pops up when the information inside a cell doesn't align with what the plugin needs. For instance, using a full state name like "California" instead of the two-letter code "CA" in the condition_value column will trigger this error every time.
Similarly, a 'File Not Readable' error often points to a problem with the file's encoding. Your CSV must be saved with UTF-8 encoding to ensure special characters and standard text are interpreted correctly. Most spreadsheet programs like Google Sheets and modern versions of Excel do this by default, but it's something to double-check if you're running into persistent trouble.
The key takeaway here is to treat your CSV file like a precise set of instructions. Every header and every value must be exact. A single incorrect entry can stop the entire process, so a quick review before you hit "upload" is always time well spent.
If you hit an error that isn't covered here, the best next step is to check the official resources. You can find more detailed solutions and guidance in the comprehensive Ship Restrict troubleshooting documentation, which provides step-by-step fixes for a wider range of potential import snags.
Your Questions on Bulk Importing Answered
Even with a step-by-step guide, jumping into a new tool always brings up a few questions. Let's tackle some of the most common ones we hear from store owners using the Bulk Import Shipping Restrictions from CSV feature for the first time.
Getting these details sorted out upfront can save you a ton of headaches down the road.
Can I Use a CSV to Delete Rules in Bulk?
The short answer is no. We intentionally designed the import function to only add or update rules.
This is a critical safety feature. It prevents you from accidentally wiping out your entire ruleset with a single misplaced file or a simple mistake in your CSV. We’ve all been there, and it’s a situation we want you to avoid.
If you do need to perform a bulk removal, the safest way is to clear out all the rules from a specific group right inside the plugin's interface. From there, you can import a fresh CSV file containing only the rules you want to keep active.
Is There a Limit to How Many Rows I Can Import?
While our plugin doesn't impose a hard limit, your web server definitely does. If you're trying to import a massive file—think several thousand rows—you might run into a server timeout. This happens when the import process exceeds your server's configured limits for things like max_execution_time or memory_limit.
If you're working with a huge ruleset, the best practice is to split it up. Break your main CSV into smaller, more manageable chunks. We typically recommend importing batches of 500 to 1,000 rules at a time. This not only dodges server timeouts but also makes it way easier to find an error if one of your imports has an issue.
What Happens If I Re-Import Existing Rules?
This is where the import tool really shines. If you upload a CSV that contains rules already in your system, the importer is smart enough to know they're not new.
Instead of creating messy duplicates, it will simply update the existing rules with the new information from your file.
This is incredibly powerful for making widespread changes. Imagine you need to change the restricted shipping method for dozens of state-based rules. Instead of editing each one by hand, you can just tweak the details in your master CSV and re-upload it. The whole process takes minutes, not hours.
Ready to automate your shipping compliance and get rid of costly errors for good? Grab Ship Restrict today and completely change how you manage your WooCommerce shipping. Start saving time and protecting your business now.
Automate Shipping Compliance
Stop worrying about restricted states. Ship Restrict handles it automatically.

Cody Yurk
Founder and Lead Developer of ShipRestrict, helping e-commerce businesses navigate complex shipping regulations for regulated products. Ecommerce store owner turned developer.
Automate Shipping Compliance
- Block restricted states
- No more cancellations
- Set and forget
3-day free trial · Card required